How to Make a WordPress Website (Ultimate Guide)
- Aishwarya Sharma
- May 23, 2025
- 32 min read

Updated: Oct 15, 2025
Are you looking to construct a site from scratch? Building a trade or individual site utilized to be very challenging in the past, particularly if you weren’t a tech-savvy person.
The great news is, with all the distinctive choices accessible on the web nowadays, beginning a site has ended up amazingly simple for anybody, indeed if you have zero experience!
Basically, if you know how to studied, point and press with your mouse, at that point you can make a site in less than 60 minutes.
In this step by step direct, we’ll appear you how to begin a site in 5 basic steps with no specialized information needed.
Below is a table of substance you can utilize to effortlessly explore the post. Feel free to skip ahead if you’ve as of now got a few steps covered:
Why Construct a Site From Scratch
Things You Require to Know Some time recently Your Construct a Site
How To Make a Site From Scratch
Step 1: Purchase a Space Title and Facilitating Account
Step 2: Introduce WordPress
Step 3: Customize Your Site
Step 4: Design Your Site Settings
Step 5: Dispatch Your Website
Market, Oversee, and Develop Your Site
But to begin with, let’s be clear on why you ought to construct a site from scratch and who is it best suited for.
Why Construct a Site From Scratch?
With thousands of websites being made each day, you might be pondering, why begin a site? There are so numerous out there as of now, how may you compete? But, it’s critical to keep in mind, indeed if your site isn’t the most well known one out there, it can still have enormous benefits for you.
By making a site from scratch, you can grow your reach to a more extensive gathering of people and interface with like-minded individuals around the globe. And with the right methodologies in put, your site can too offer assistance you construct a unfaltering stream of online income.
Some benefits of beginning your possess site include:
Showcase your portfolio: You can make a site that exhibits your work involvement, work of art, clientele, and more to make a great impression on potential leads.
Create inactive wage: With advertisements, member showcasing, or offering items online, you can construct a site to make yourself a few additional cash on the side.
Take your commerce online: If you have an existing commerce, you can begin a site to advance your trade and get modern clients online.
Share your mastery: You can make online courses, blogs, and more so other individuals can advantage from your involvement and knowledge.
Connect with Unused Individuals – A site of your claim can offer assistance you interface with other like-minded individuals from all over the world.
Share Your Enthusiasm – If you’re enthusiastic around something, you can make a site to share that energy with others.
Help Others – There are bounty of openings to construct gift, pledge drive, and mindfulness websites.
Plus, these days, beginning a site is so simple and reasonable. So, there’s nothing ceasing you from making your claim site, whether it’s for trade, or for fun.
Things You Require To Know Some time recently You Construct a Website
Before you make a WordPress site, you require to choose what sort of site you ought to make and which site stage you need to utilize. To offer assistance you choose, here’s what we’ll examine next:
Types of Site You Can Create
Choosing the Right Site Builder
Types of Websites You Can Create
The sort of site you need to make is an vital step in figuring out how your site ought to see and what you require on your website.
There are a number of diverse sorts of websites. We’ll go over a few of them underneath to offer assistance you choose what sort of site you need to make.
1. Online Store
An online store, something else known as an eCommerce site, is where individuals can buy items specifically from your location. You’ve likely gone to a number of eCommerce websites some time recently, most huge brands have them such as Walmart, Amazon, Best Purchase, and so on.

You can visit these websites, buy a item online, and have it dispatched to you. But online stores aren’t fair for huge brands, littler companies can have them too.
On an eCommerce site, you’ll require to list the items you have for deal, which incorporates an picture, item depiction, and cost. You too require a shopping cart and a checkout page where guests can enter their installment data to make a purchase.
So, if you arrange to offer items on your site, you’ll need to make an online store.
2. Blog
A web journal is an enlightening site with frequently upgraded posts/articles composed in an casual, conversational fashion displayed in switch chronological arrange (most up to date web journal posts to begin with). When blogs were to begin with presented, individuals primarily utilized them as a sort of online journal where they would share what they ate for breakfast, what they did that day, shared their considerations, and so on.
But nowadays, blogs are much more than that. Blogs aren’t fair for fun any longer, you can really make cash from a web journal by including advertisements and partner joins. Also, individuals can visit blogger websites not fair to perused approximately someone’s life, but to learn approximately a wide assortment of themes. A few prevalent blogging specialties include:
Lifestyle
Tech
Entrepreneurship
Food/Recipes
Parenting
Health/Fitness
Travel
Finances/Budgeting

If you need to share your information on a specific point, you ought to select to begin a web journal website.
For more point by point data, check out our post on what is a web blog and the contrasts between a web journal and a WordPress website.
3. Forums
A gathering site is an online dialog location where individuals can hold discussions in the frame of posted messages. This is diverse from a live chat site since gatherings are nearly never live and the messages can be perused at any time by anybody on the website.
A gathering site, moreover known as a message board, is an opportunity for like-minded individuals to come together to examine a wide assortment of subjects. Gatherings are as a rule organized and orchestrated into distinctive points so that clients can effectively discover what they’re looking for.
Some well known gathering websites incorporate Quora and Reddit.

If you need to make an online community for clients to talk about a point or a assortment of points, consider making a gathering website.
4. Specialty Social Network
We’ve all listened of social organizing destinations like Facebook and Twitter, which are stages that gloat billions of clients. But a specialty social organize location targets as it were a specific portion of the common population.
On a specialty social arrange, clients can frame associations with others that are comparative to themselves or interested in the same subjects. For occasion, you may make a specialty social organize for canine proprietors or for proficient musicians.
Some well known specialty social systems incorporate Classmates, Last.fm, and Meetup.

Want to make a tight-knit community that permits like-minded individuals to interface with each other? Begin a specialty social organize site.
5. Enrollment Site
A participation location is a gated site where as it were the individuals who have subscribed can get to the substance behind the entryway. The “gate” is basically a boundary that you put on the front of your site, where clients have to log in to get get to to your elite substance and uncommon offers or to associated with the community. A enrollment location can be paid, free, or a bit of both.
You can effortlessly turn any site into a enrollment location utilizing a WordPress plugin like ProfilePress or MemberPress.
Some well known participation destinations incorporate Wishlist Insider, Calm Theory, and Specialist by CopyBlogger.

If you need to make a site with a VIP feel, consider making a enrollment site.
6. Inactive Trade Site
Another prevalent sort of site is a inactive trade location. A inactive trade location is an constant, once in a while upgraded site that speaks to and advances a particular trade. This sort of site exists so that individuals can find your trade online and see what you have to offer.
A inactive trade location may incorporate the address of your commerce, your phone number, a contact page, and an outline of what your trade does. They moreover ordinarily incorporate an Around page so your potential clients can get to know you and your qualifications, a list of the administrations you offer, trade photographs, and surveys or testimonials.
Some examples of static business sites include Awesome Motive and small business websites like New Eco Landscapes.

So, if you need to make an online nearness for your little commerce and don’t have items to offer online, select a inactive commerce site.
Hopefully, you’ve presently chosen what sort of site you ought to make. The following step is to begin building it! But to begin with, you’ve got to select the right site builder.
Choosing a Site Builder
Building a site utilized to be troublesome. If you need your possess site, you would have to begin building it from scratch, which requires an master level of coding abilities. Or you would have to contract a web originator to construct it for you, which might be very costly. Fortunately, that’s not the case anymore.
There are a number of site builders on the showcase that permit you to effortlessly construct a site in no time. But not all site builders are made similarly. And with so numerous to select from, how do you know which site builder is best for you?
We’ll go over a few of the best site builders. We’ll examine their highlights, ease of utilize, cost, and more, to offer assistance you choose which site builder is the best choice for building your website.
The taking after site builders are all beginner-friendly, which implies you can make a site from scratch in a matter of hours with any of these alternatives. We’ll audit each one to offer assistance you choose which is best for your needs.
1. Wix

Wix is a drag and drop site builder that permits you to make any sort of site effortlessly. You can plan your possess site beginning with a clear slate or you can select from over 500 designer-made layouts that will provide your site a proficient see in an moment. You can too include video foundations, livelinesss, and more, easily.
Pros:
Free – Wix website offers a free site creation arrange that permits you to make a straightforward drag and drop site with constrained features.
Responsive Plan – Any site you make with Wix will be optimized for versatile, tablets, and desktops. This implies no matter what gadget your site guests are utilizing, your site will adjust accordingly.
Advanced Highlights – Wix website builder makes it simple to coordinated progressed highlights, such as including an eCommerce storefront. It too gives SEO apparatuses and guides to offer assistance optimize your location for natural traffic.
Cons:
Wix-Branded Advertisements – Wix shows branded advertisements on your site with the free arrange, you require to overhaul to a premium arrange to expel ads.
Limited Customization – Customization is restricted with Wix. You have to update to a premium arrange to get get to to more highlights, and indeed at that point it’s still restricted compared to other site builders. For occasion, if you need to acknowledge online installments on your site, you require to update to a commerce arrange beginning at $20 per month.
No Trade – Wix offers no way to trade your site information. So, if you need to move your site to another stage in the future, there’s no simple way to do so.
Price:
Wix web permits you to construct a straightforward site from scratch for free. Be that as it may, to get to more effective highlights and expel Wix-branded advertisements, you must overhaul to a paid site arrange. These plans extend from $5/ month to $29/month. As we specified prior, if you need to begin an eCommerce site with Wix, you’ll require to update to a Commerce & eCommerce arrange, which ranges from $20/month to $35/month.
2. GoDaddy Site Builder
godaddy site builder
GoDaddy is a well-known space recorder and facilitating benefit supplier, but it too offers a basic drag and drop site builder. They offer a number of site builder formats to get you begun. Additionally, those formats are effectively customizable utilizing their mix-and-match sections.
Pros:
Marketing Devices – GoDaddy Site Builders comes with a number of showcasing instruments counting SEO and mail showcasing to boost your online presence.
Website Sort Alternatives – This site builder lets you make a number of diverse site sorts. You can effectively include a web journal or eCommerce storefront to your site.
Mobile-Friendly – All websites made on GoDaddy Site Builder are mobile-friendly.
Cons:
Limited Customization – This site builder offers less plan choices and less highlights for your location than other options.
Price:
There is no free arrange advertised with this site builder. You can get begun with Go Daddy Site Builder for as it were $5.99/month with their Individual Arrange. If you need to acknowledge online installments or gifts with PayPal on your site in spite of the fact that, you’ll require to update to the Commerce arrange for $9.99/month.
Want to make an eCommerce location with Godaddy website builder? At that point you’ll require to select the most costly arrange, Online Store, which will taken a toll you $29.99/month.
3. Shopify
Shopify is a prevalent site builder adapted towards eCommerce websites. This web-based site builder lets you make an online store in no time, without having to bargain with any code. They offer a ton of free and paid, customizable subjects to deliver your online store a proficient see in an instant.
Pros:
Online Installments – You can acknowledge installments on Shopify without any third-party accounts. Also, they consistent integration with over 100 third-party installment gateways.
Advanced Promoting Devices – Shopify offers progressed showcasing instruments such as SEO instruments and built-in blogs. In expansion, they give promoting dashboard reports so you can keep an eye on the execution of your online store.
Mobile-Friendly – Your online store will see incredible no matter what gadget clients are seeing your location on.
Cons:
Transaction Expenses – If you utilize an outside installment portal, you’ll be charged a strong exchange charge, extending from 0.5 to 2%.
Expensive Apps – Apps for social media integration, live chat, streak deals, and more have to be obtained independently. This can make customizing your online store exceptionally expensive.
Price:
You can get begun with Shopify website for $29/month with the Fundamental arrange, this incorporates a 3% exchange charge. You can update to the moment most elevated arrange, $79/month, to decrease the exchange expense to 1%. If you need to decrease the exchange expense to 0.5% and get get to to all of the progressed highlights you require to run your online store, you’ll require to update to the most costly arrange which costs $299/month.
4. Squarespace

Squarespace is another prevalent site builder that comes with everything you require to construct a individual or trade site. They offer a extend of shocking layouts outlined for a assortment of businesses and specialties to change your site in a moment. Additionally, each layout comes with a number of customizable features.
Also, check out our step-by-step direct on exchanging from Squarespace to WordPress.
Pros:
Bandwidth & Capacity – With any of their plans, you get boundless transfer speed and boundless storage.
No Exchange Expenses – You won’t get charged exchange expenses for eCommerce exchanges with their eCommerce fundamental or progressed plans.
Cons:
No Free Arrange – Squarespace website doesn’t offer any free arrange, not at all like other site builders. Furthermore, their beginning arrange is pricier than other site builders as well.
No Third-Party Apps – Squarespace doesn’t permit any third-party apps or extensions.
Price:
The individual arrange for Squarespace costs $12/month, this incorporates the capacity to construct boundless pages. If you need to include an eCommerce storefront to your site, you’ll require to overhaul to their commerce arrange which costs $18/month with a 3% exchange expense. If you need to expel exchange expenses, you’ll require to overhaul to their essential online store arrange for $26/month.

WordPress.org is the most well known site builder of all time, and it really powers over 30% of all the websites on the web. With WordPress, moreover known as self-hosted WordPress, you can effectively construct any sort of site you need counting a web journal, little commerce or undertaking trade site, eCommerce store, portfolio, and more.
Pros:
Endless Customization – With WordPress you get get to to thousands of free and paid subjects to change the see of your site. Furthermore, you can alter your topic effortlessly, any time you need. You moreover get get to to thousands of free and paid plugins to customize and include additional control to your site. Making a fully-customized site is simple and reasonable with WordPress.
Control – When you utilize WordPress, you have total control of your website.
Cons:
Slight Learning Bend – Learning how to utilize WordPress takes a bit of time. But, there are plugins you can utilize to make the handle less demanding like drag and drop page builders.
Can’t Make Free Site – You can’t make a free site with Wordpress com org, you’ll require to pay for facilitating and a space name.
Price:
Wordpress computer program is open source and free to utilize, but you still require to spend a few cash to make a site. You’ll require to buy a space title and web facilitating, but don’t stress, these can be exceptionally reasonable depending on which suppliers you select. Additionally, we’ll go over how to buy a space title and web facilitating assist on in this guide.
Why Do We Suggest WordPress.org?
WordPress is by distant the best CMS stage (substance administration framework) for building a site. It’s the most well known site builder for a reason. You can utilize WordPress to construct any sort of site you need, whether it’s a commerce site, web journal, participation location, gathering location, eCommerce location, and so on. Furthermore, with WordPress, you get moment get to to any include you require to make your site successful.
Also, check out our article on best WordPress books for more assets on WordPress.
WordPress is the most well known site builder stage accessible on the web. It powers over 30% of all websites today.
Here are a few reasons why we select WordPress over others:
Free – WordPress is free to utilize. You require to buy a space title and web facilitating but indeed with those costs, WordPress is still one of the most reasonable site builders out there.
Popular – Fueling over 30% of all websites online, WordPress is the most utilized site builder by distant. There’s security in numbers.
Community – There’s a tremendous WordPress community online. Anytime you have an issue or require an reply to a address, you can discover tons of articles, instructional exercises, and dialogs online to offer assistance you out.
Themes & Plugins – With other site builders, you require to pay additional to get get to to plugins that include more control and customization to your site. But with WordPress, you get get to to thousands of free plugins right away. Not as it were that but they too offer thousands of free subjects as well.
Easy to Utilize – Whereas WordPress takes a few getting utilized to, it’s really exceptionally straightforward and simple to utilize. Introducing WordPress itself takes no time at all either, numerous facilitating suppliers give 1-click WordPress installation.
So, in general, we suggest utilizing WordPress to construct your site. Indeed total fledglings can make a completely customized site with WordPress in no time.
Don’t get WordPress.org befuddled with WordPress.com in spite of the fact that. We suggest building your site with WordPress.org since you get total control over your site, boundless customization alternatives, and it’s less costly as well. For more subtle elements, check out our article comparing WordPress.com vs. WordPress.org.
How to Make a Site From Scratch
We’ll appear you how to make your claim site in 5 straightforward steps. The best portion is you don’t require to know any code or be tech-savvy.
We’ll offer assistance you get your WordPress site up and running in less than an hour. All you have to do is take after the step-by-step direct below.
Step 1: Purchase a Space Title and Facilitating Account
To begin a site on self-hosted WordPress.org, you’ll have to claim a space title and a web facilitating account.
Domain title: Your space title is your website’s address (URL) on the web, like Google.com or SmartWpseo.com. It’s what your clients sort in their browsers to get to your site. A space title is like advanced genuine bequest and can be truly costly. They more often than not taken a toll around $14.99 per year but can go into thousands, indeed millions.
Related: Best site title generator apparatus (Completely free)
Web facilitating: Your web facilitating account is where your website’s substance and records are put away online. Think of it as your website’s physical house. When a guest tries to get to your site by writing in your web address (space title), they’ll be coordinated to the site you’ve set up in your web facilitating server. Web facilitating regularly costs $8.99 per month.
The combined taken a toll of a space title and facilitating can be very costly, particularly if you’re fair beginning out.
That’s why we’ve worked out a bargain with Bluehost to offer our clients a FREE space title and 70% off on web facilitating. It’s a extraordinary bargain to get begun as moo as $2.75 per month.
Bluehost is one of the biggest facilitating companies in the world. They’ve been working with the WordPress community since 2005, and they’re an authoritatively prescribed web facilitating supplier by WordPress themselves. Examined our Bluehost audit for more information.
Note: We accept in full straightforwardness. If you buy facilitating utilizing our referral connect, at that point we will get a little commission at no extra fetched to you. You’ll really get a rebate on facilitating + a free space title + free SSL. We can get a commission from fair approximately any facilitating company, but we prescribe high-quality items that we genuinely accept will donate esteem to our readers.
To begin your WordPress site, head over to Bluehost’s site and press the Get Begun Presently button.

On the following page, you’ll be inquired to select a arrange. Since you’re fair getting begun, you ought to select the fundamental arrange. It incorporates a free space title and free SSL certificate. You can continuously update afterward as your location grows.

On the another screen, you will be inquired to select an existing space you possess or you can buy a unused space for free. Go ahead and buy a modern one since it’s free.

You’ll presently be provoked to enter your account data. For simple enrollment, you can sign in with Google with fair a couple of clicks.
After entering your subtle elements, scroll down on the page until you discover the bundle data box. You can select the fundamental arrange for 12 months, 24 months or 36 months. You can too see that a few addons are preselected, including up the add up to cost. We prescribe unchecking the addons since you won’t require these right absent. You can continuously buy them afterward if your needs change.
Choosing the 36-month arrange will get you the best esteem for your money.

Once you’re done choosing your plans, scroll down the page assist to enter your installment subtle elements. You have to concur to their Terms of Benefit and at that point tap Submit.
That’s it!
You’ve effectively subscribed to a facilitating arrange. You’ll be inquired to make a secret word for your account.
Next, you’ll get an mail with subtle elements on how to log in to your web facilitating control board (cPanel) where you can oversee everything from facilitating records to emails and support.
Step 2: Introduce WordPress on Your Web Host
With Bluehost, you don’t have to go through a partitioned WordPress establishment prepare since Bluehost presently introduces WordPress by default. All you have to do is select your WordPress subject, indicate the title and tagline for your site, and you’ll be prepared to get begun with WordPress.
After subscribing to your facilitating arrange, you’ll be provoked to select a WordPress topic. You can fair choose anything amid this step since you can continuously alter your subject afterward (we’ll appear you how to do so in a afterward step of this instructional exercise). The most vital portion is to begin building your location so any topic will do the work for now.

You’ll at that point be inquired to select the title and tagline for your website.

After indicating the subtle elements, tap Following. Bluehost will presently introduce WordPress for you and, once done, will appear you a screen like this:
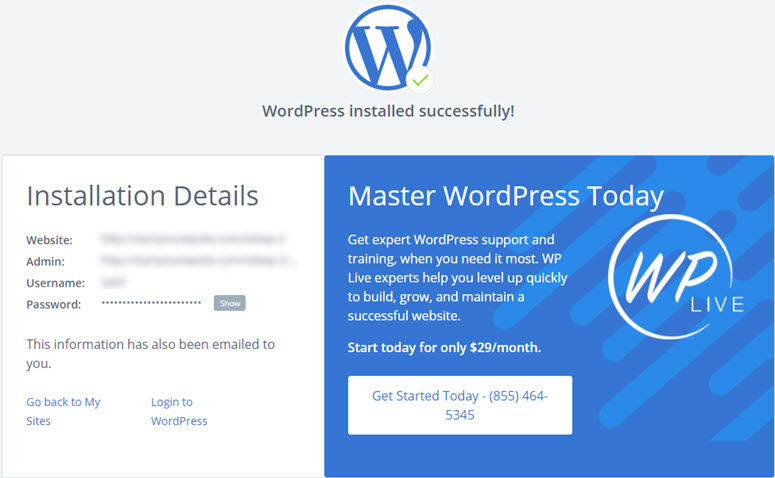
You can log into your location by adding wp-admin to your URL. Here’s what your WordPress login URL ought to see like:
You can presently log into your WordPress site with the accreditations sent to your mail address.

You’ll see the user-friendly WordPress dashboard which we’ll appear you how to utilize next.
Step 3: Customize Your Website
Customizing your WordPress location is simple. We’ll educate you all the basic customizations you require and appear you where to discover them in WordPress.
1. Put Your Location in Coming Before long Mode
Coming Before long mode will stow away your site from open see and make beyond any doubt that it doesn’t show up in look motor comes about. This way, no one will inadvertently see a half-developed website.
Coming before long mode moreover lets you keep your thoughts and dreams a mystery from competitors and other trade owners.
We prescribe utilizing a plugin called SeedProd. From the menu on the cleared out, go to Plugins » Include Modern page.

Search for SeedProd and introduce and enact the plugin. At that point SeedProd will show up in your WordPress menu. Open the plugin dashboard and turn on Coming Before long mode.
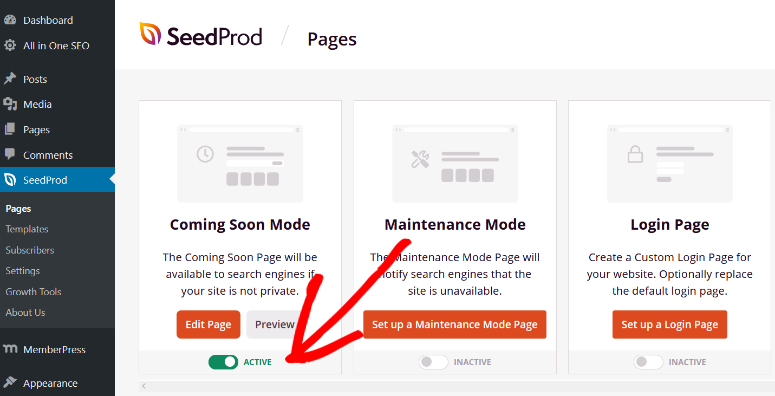
SeedProd lets you make a one of a kind page to show to anybody who comes to your site. You can include optin shapes and commencement clocks to construct force for your location too.
Now, you can calmly set up your site behind the scenes.
2. Alter Your WordPress Theme
With WordPress, you can effortlessly alter the visual appearance of your site. All you have to do is to discover the right WordPress topic and introduce it on your WordPress website.
The default WordPress topic is great, but if you need a distinctive see and feel for your location, at that point you can discover an elective subject from the official subject registry and introduce it on your location. Finding the culminate topic will empower you to make the site plan really yours and allow it that individual “you” feeling.
It’s exceedingly suggested to take a see at our beat WordPress subjects list some time recently you jump in and introduce a arbitrary theme.
If you select a premium subject, at that point it has to be downloaded from the topic vendor’s location and transferred to your WordPress.
If you choose to go with a free WordPress subject from the official topic store, at that point you can introduce it specifically from your WordPress dashboard without a manual download from your computer.
To introduce a free subject, explore to Appearance » Topics in your WordPress dashboard. At that point press the Include Modern Subject box.

This will appear you a few highlighted topics in your dashboard. Some time recently introducing, you can indeed see at the see and its points of interest by clicking on the image.
You can too channel topics based on formats, highlights, and your site specialty by clicking on the Highlight Channel button.

In the right-hand corner, sort the theme’s title in the look bar. Once you’ve found the culminate topic, drift over its picture and at that point press the Introduce button. Following, tap the Enact button to alter your website’s appearance.

3. Make Your To begin with Page
After changing your site’s appearance, it’s time to make a unused page on your site.
In the left-hand menu of your WordPress dashboard, you can discover two comparable alternatives that are frequently confounding for apprentices: Posts and Pages.
Choose Pages if you need to make standalone pages in your WordPress site such as an Almost Us page, Contact page, Terms of Benefit page, etc.
Choose Posts if you need to make a web journal post that shows up in turn around chronological arrange (more current ones to begin with) on your WordPress site. Posts are too organized into categories and labels. You can studied the contrast between categories and labels for more data almost this.
To make your to begin with page, head over to your page editor by clicking on Pages » Include Unused. You’ll see the editor where you can begin making your page. You will require to include a title for your page some time recently you begin composing substance in the page editor. Presently tap on the ’+’ button to include a block.

You’ll see a few choices here. Presently select the square based on what you need to include to your page. If you need to include a passage, select the passage choice; for pictures select the picture alternative and at that point transfer an picture from your neighborhood computer or select one from the library and so on.
4. Setup a Inactive Homepage
By default, WordPress appears your blog’s most recent posts as your homepage instep of a inactive page. If you need to set a custom page as your homepage, at that point basically take after the steps below.
After making a page, go to Settings » Perusing on your WordPress admin dashboard. In the Your Homepage shows choice, you’ll require to select A inactive page and select the page you need to show as your front page in the dropdown menu. Once you’re done, tap the Spare Changes button.

5. Include a Route Menu
Your route menu sticks to the beat of your site, so your guests can effectively discover the most critical pages and joins, making it simple to investigate your site.
To include a route menu, you require to go to Appearance » Menus in your WordPress admin. Indicate a menu title in the Menu Title field (this comes in particularly convenient if your topic bolsters numerous route menus). At that point, press Make Menu.

You can presently select from your existing pages, posts, custom joins, and categories. After selecting what you feel merits to be included, press Include to Menu. With drag and drop, you can position the menu’s structure. At that point, you’ll require to indicate the show area and tap Spare Menu.

You may need to bookmark this post for afterward: 11 Best Responsive Menu Plugins for WordPress (Compared). You can come back and check it out when you need to upgrade your website’s menu.
6. Include and Customize Your Widgets
Widgets are pieces of substance that you can include to your site’s sidebar, footer, header, and other widget-ready areas.
This permits you to include customized/dynamic substance. You can include things like menus, calendars, contact shapes, displays, and other clever things on your website’s sidebar or footer area.
To include a gadget, go to Appearance » Widgets and select from the accessible widgets. You essentially drag and drop your favored highlights to the widgetized zone of your WordPress site.

7. Customize WordPress with Plugins
The excellence of WordPress is that you can effortlessly improve the capabilities of your location by basically introducing the right plugins. Think of plugins as apps for your site (i.e. contact frame, exhibition, etc).
Just like WordPress subjects, you can effectively discover and introduce free plugins from the WordPress plugins store inside your WordPress dashboard.
All you have to do is to visit Plugins » Include Unused. Utilize the look box in the right-hand corner to discover a plugin, and tap the Introduce Presently button. Once it’s introduced, tap the Enact button to get it working.

Step 4: Designing Your Site Settings
Next, you’ll need to arrange your site settings. Designing the essential WordPress settings is vital to how your location capacities. There are a few key site settings you ought to center on, we’ll go over those below.
1. Make Your Location Obvious to Google
First, you require to make beyond any doubt your site is obvious to Google. This permits your site to be positioned in look motor comes about, which will permit clients to discover you on the web easier.
In the WordPress dashboard, go to Settings, at that point to the Perusing area. In the Look Motor Perceivability area, make beyond any doubt the box is unchecked.

2. Set the Permalink Structure
Next, you’ll need to set the permalink structure. A permalink is the web address utilized to interface to your substance. By default, WordPress sets the permalink structure, but it’s not the most optimized. Instep, you’ll need a permalink structure that will offer assistance look motors and your site guests effectively get it your content.
So, go to Settings, at that point to Permalinks. Beneath Common Settings, select the Post title option.

3. Comments and Notifications
If you’re beginning a web journal or blogging on your site, you’ll moreover need to arrange the comment settings for your website.
Any web journal ought to permit clients to comment on posts, this increments engagement on your site, boosts the time clients spend on the page, and energizes them to visit your site again.
To design the comments, go to Settings, at that point Talk. Here you can select whether you need to permit individuals to comment on modern articles and permit interface notices from other blogs (pingbacks and trackbacks) on unused articles.
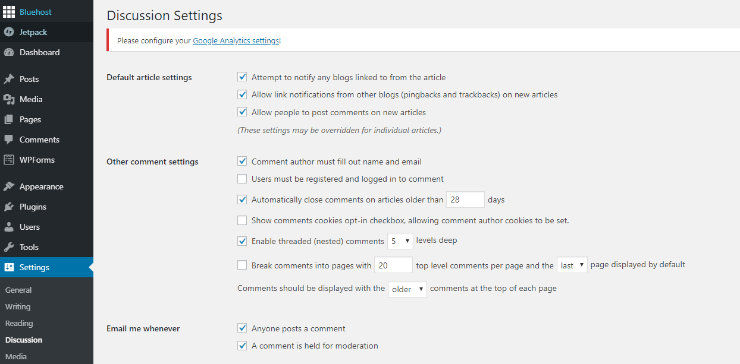
You can moreover choose whether you need commenters to have to fill out their title and e-mail some time recently commenting or be enrolled and logged in to comment. In expansion, you can select to get an e-mail notice anytime somebody comments on your blog.
4. Upgrade Your Timezone
You ought to moreover make beyond any doubt your WordPress location is set to the rectify timezone. Planned exercises and plugins will go by the time your WordPress is set to.
So, to make beyond any doubt your WordPress site is set to your redress timezone, go to Settings and at that point to General.

In the dropdown menu another to Timezone, select a city in the same timezone as you or a UTC timezone offset.
Step 5: Dispatch Your WordPress Website
Before you dispatch your site, we prescribe seeing it and making beyond any doubt everything works impeccably fine.
Putting out your site for the world to see some time recently it’s prepared can affect your notoriety and taken a toll you future clients. So, some time recently you dispatch your site, you require to make beyond any doubt you’ve got everything in order.
Pre-Launch Checklist
To anticipate you from propelling your site some time recently it’s prepared, here’s a before-launch checklist you can take after. Check out the list underneath and some time recently you make your site live, make beyond any doubt you can check off each step.
Check vital pages – Construct your site and make beyond any doubt you have all the critical pages such as a domestic page, around, contact page, etc.
Check for Blunders – Check your site for small blunders such as designing and spelling botches. Make beyond any doubt it’s simple to examined by checking textual styles and colors.
Check Pictures – Check to make beyond any doubt your pictures show up on your location, they’re optimized, and they have alt text.
Test Joins – Test all of the joins on your site to make beyond any doubt they work and lead to the adjust put. This incorporates your location route as well as any button joins or joins inside the content.
Configure WordPress Settings – Arrange WordPress settings like look motor perceivability, permalink structure, comments and notices, and timezone.
Install Analytics – Make a Google Analytics account and utilize MonsterInsights to track your site information. Test to make beyond any doubt it’s following precisely some time recently propelling your site.
Test for Portable – Make beyond any doubt your site is mobile-friendly and looks great on diverse portable devices.
Check Browser Compatibility – Make beyond any doubt your location shows up legitimately in all diverse browser sorts utilizing a instrument like BrowserShots.
Test the Execution of Your Location – Test the speed and execution of your site to make beyond any doubt it’s optimized for clients. You can utilize our Free Site Speed Test Apparatus to test your location and get proposals for improvements.
Optimize Your Location for SEO – Introduce a plugin like All in One SEO in arrange to optimize your site for SEO.
Secure Your Location – Introduce a security plugin for your location like Sucuri.
Install SSL – Make beyond any doubt your location is running on HTTPs which secures any information when it’s exchanged from and to your site.
Create a Reinforcement – Be beyond any doubt to make a duplicate of your site. When things go off-base, you can reestablish your site back to its unique state. You can utilize a reinforcement plugin like UpdraftPlus to take customary robotized backups.
Block Spam – The web is perplexed with spam bots that discover your location the miniature it goes open. At that point they take off spam comments which fair includes to your admin assignments. The best way to anticipate spam comments is with Akismet.
After you’ve checked off each step in this before-launch checklist, it’s time to make your site live!
At the begin of this instructional exercise, you utilized SeedProd to cover up your site. To dispatch the location, all you have to do is head over to the SeedProd page in your wp-admin panel.
Now utilize the same flip switch to cripple Coming Before long mode here.

SeedProd will expel the coming before long page and your site is formally propelled! And that’s a enormous bargain so congratulations!
By propelling your claim site, you’ve crossed a colossal breakthrough. Another, you require to showcase, advance, and oversee your location accurately in arrange to stand out from the swarm and be successful.
Market, Advance, and Develop Your Website
No matter what sort of site you need to make, you’ll require to include the same fundamental highlights (such as the capacity to make a contact shape, the capacity to effortlessly include SEO labels, and so on).
With WordPress, you can effectively include those highlights without contracting a web engineer or composing a single line of code. All you have to do is to discover the right plugin and introduce it on your site.
We’ll explain…
Add a contact shape to your website
Track your guests utilizing Google Analytics
Improve your website’s SEO
Grow your e-mail supporter list
Start blogging
Sell online with an eCommerce storefront
Add a talk board/forum
Make your site accessible in numerous languages
Must-have WordPress tools
1. How to Include a Contact Frame to Your Website
Regardless of your site’s specialty, estimate, and reason, including a way for individuals to contact you is fundamental. But when you include your contact data, you’ll likely be spammed with undesirable special calls and emails.
Instead, you can utilize contact shapes with spam channels. Your guests can effectively reach out to you right from your site without having to log into their e-mail account.
WPForms is the best contact shape plugin for WordPress beginners.

WPForms lets you make any sort of online shapes hassle-free such as contact shapes, gift shapes, enrollment shapes, signup shapes, and more.
There’s a drag and drop builder and permits you to customize and distribute the shapes you make anyplace on your location with ease.
A few more benefits of utilizing WPForms:
1,700+ formats and a drag and drop builder
100% responsive meaning they work on portable, tablets, and desktop browsers.
Integrates with e-mail promoting instruments or third-party web apps
Built-in spam protection
Read the total WPForms audit for more information.
Want to make a contact shape the simple way? Take after our direct: How to Include a Contact Frame to Your WordPress Website.
2. How to Track Your Guests Utilizing Google Analytics
If you need to develop your site activity, at that point you’ll to begin with require to get it how individuals are finding your site and what they do when they get there.
The most effortless way to track client intelligent on your location is by utilizing Google Analytics. Google Analytics is the best following arrangement for websites, and it’s totally free to use.
The MonsterInsights plugin makes it simple for you to set up Google Analytics on your WordPress website.

MonsterInsights lets you utilize Google Analytics’ full potential, such as following record downloads, advertisements, shape entries, eCommerce exchanges, etc., without touching a single line of code.
Read the total MonsterInsights audit for more information.
To set up Google Analytics on your location, take after this direct: How to Include Google Analytics to WordPress.
3. How to Make strides Your Website’s SEO
Want to draw in a focused on group of onlookers to your site? The best way to draw in focused on guests is to drive more look motor activity, moreover known as natural activity, by moving forward your website’s SEO.
According to OptinMonster, SEO is the hone of expanding your site activity by getting your web pages to rank higher in look motor comes about. Guests who arrive at your location by means of look motors are called natural traffic.
SEO can get specialized and complicated, but, much obliged to free SEO plugins, it has gotten very simple to move forward your WordPress SEO, indeed for beginners.
While you can discover tons of distinctive SEO plugins out there, we utilize and suggest All in One SEO. It’s the most prevalent SEO plugin for WordPress (for great reason!).
With All in One SEO, you can screen and optimize your site’s SEO specifically from your WordPress dashboard. It comes with all the instruments and highlights you require to get your location to rank.
Once you introduce All in One SEO on your location, you can dispatch the setup wizard.

This wizard will inquire for your site’s subtle elements, such as:
A category that best depicts your site
Your site’s domestic page title and meta description
Your trade title, contact, symbol, and social profiles
After this, you can select what SEO highlights you would like to empower on your site.

Once that’s done, you can get to All in One SEO anytime you need from your WordPress dashboard like so:

The instrument analyzes your location and gives it an SEO score. Included to that, it appears you all basic mistakes and regions of enhancement. You’ll too see tips and notes on the steps you require to take to settle the issue.

All in One SEO too makes it simple to set up more progressed WordPress SEO highlights like sitemaps, optimized look appearance, SEO catchphrases, social media integration, SEO look support, nearby SEO, construction markup, and more.
Next, when you’re making a page or post, you can optimize it some time recently distributing. In the post alter screen, you’ll see a score for your page’s substance and feature at the top-left corner.

By clicking on it, you’ll get more settings to optimize for SEO. You can include a center watchword, meta portrayal, and correct any issues it identifies.
If you’re modern to SEO, this plugin is beginner-friendly and gives you everything you require to get begun. It moreover has everything you require to take care of specialized SEO in fair a few clicks.
All in One SEO is moreover kept up and overhauled routinely based on the most recent SEO best practices.
Get begun with All in One SEO nowadays to make strides your blog’s SEO.
4. Develop Your Supporter List
Most default signup shapes you make from mail showcasing administrations are boring. This makes lead era less successful, which moreover essentially moderates down the development of your mail list.
With OptinMonster, you can make excellent optin shapes with ease that are demonstrated to drive more signups.

OptinMonster is the #1 lead era instrument to make all sorts of showcasing campaigns like popups, coasting bars, slide-ins, and more.
It moreover comes with handfuls of focusing on choices, so you can show the frame to the right client in the right area of your location at the right time without baffling them.
OptinMonster too makes a difference you diminish cart deserting with time-sensitive behavior-based offers, which can be super supportive for online retailers.
5. Begin Blogging
Adding a web journal to your site is a awesome way to drive activity to your modern site and make it less demanding for clients to find you online. So, you’ll need to begin a web journal on your unused WordPress website.
First, choose what you’ll web journal approximately. The web journal posts you type in ought to coordinate the objective of your site. For illustration, if you’re beginning a little commerce site for your arranging company, you may web journal almost garden care tips for your clients. If you’re making an online store, you seem web journal around blessing proposals to advance your items. Of course, if you’re beginning a way of life web journal, you’ll need to compose almost way of life topics.
Step 1: Make a Web journal Post
To make your to begin with web journal post, in the WordPress dashboard, press on Posts, and at that point Include Unused. This will take you to the WordPress editor where you can begin composing your post. Essentially sort in the title of your web journal post and begin writing the body of the post underneath it.

In your web journal posts, you can include pieces such as pictures, headings, sound, exhibition, cites, list, video, and more. To include a unused piece, tap on the (+) symbol in the beat cleared out corner. The most common squares will show up to begin with. Essentially press the square you need to include to your web journal post.

Step 2: Include Categories and Tags
When making a web journal post you’ll too need to include categories and labels. Categories and labels will keep the web journal substance on your site organized and make it simple for your location guests to discover what they’re looking for.
Categories are implied to be wide groupings. For occurrence, on a formula web journal, you might have wide categories such as Breakfast Formulas, Lunch Formulas, Supper Formulas, and Dessert Recipes.
To include a category to your web journal post, go to the adapt board on the right-hand side. Beneath the Categories segment, tap Include Unused Category.

Name the category in the content field given and press the Include Modern Category button underneath. Once your unused category is made, it will show up with a blue checked box.

You can include as numerous categories and subcategories as you want.
Tags are implied to depict particular subtle elements of your post and can be utilized to micro-categorize your posts. For occurrence, a web journal post for a spaghetti formula seem be in the category “Dinner Recipes” and incorporate labels like “spaghetti recipe” and “homemade pasta”.
To include a tag, go to the board on the right side of the WordPress editor. Beneath the Labels segment, sort in your tag and press enter to include a tag to your post.

Once you’re wrapped up composing your web journal post and including categories and labels, tap the blue Distribute button in the best right-hand corner to make your web journal post live on your website.
6. Include an eCommerce Storefront
The eCommerce industry is booming and the future of retail is eCommerce. With WordPress, including an eCommerce storefront to your location is as simple as introducing a plugin.
While you can discover handfuls of eCommerce plugins, WooCommerce beats the pants off all the competition and remains ahead of the bend with its interesting highlights and ease of use.

WooCommerce is the best eCommerce plugin for WordPress. It lets you effectively coordinated a storefront with your existing site and permits you to acknowledge installments through PayPal. That said, it’s in your best intrigued to make beyond any doubt that your WordPress subject is consistent with WooCommerce.
A few highlights of WooCommerce are:
Allows you to effortlessly offer physical or computerized products on your website.
Easily include more installment doors with addon plugins.
Support tons of free and premium addon plugins to upgrade your storefront.
If you require to contract designers to include custom highlights to your location, it’s simple to discover them since WooCommerce is the most well known eCommerce arrangement for WordPress.
Read the total WooCommerce audit for more information.
Learn how to begin offering right absent: How to Make a Productive Online Store – Step by Step.
7. Include a Dialog Board/Forum
Adding a dialog board or gathering interior your WordPress-powered location is accommodating to develop an locked in community. WordPress makes it simple to give strung dialog gatherings where your clients can blend and collaboratively work with a bigger public.
bbPress is one of the best WordPress gatherings plugins, and is made by the same people behind WordPress.org.

Some of the cool benefits of controlling your site with bbPress gatherings are:
Hundreds of addon plugins are accessible that let you effectively upgrade your forum.
Makes it simple to get your gatherings up and running with fair a few clicks.
Comes with a full set of highlights counting amplified profiles, bunch gatherings, notices and movement logging, etc.
Read the total bbPress review.
Looking to coordinated a discourse board/forum with your location? Get begun with bbPress today.
8. Make Your Site Accessible in Different Languages
Want to reach a more extensive gathering of people by making your site accessible in numerous dialects? Making a multilingual site and coming to a worldwide gathering of people is simple with WordPress much obliged to the distinctive sorts of interpretation plugins accessible in the market.
With WordPress, you can discover tons of diverse plugins that make it straightforward to make a multilingual site.
Whereas a few plugins center on ease of utilize and empower you to effortlessly make and oversee your multilingual site, other plugins offer assistance you convey mechanized interpretation based on users’ inclinations. You can too discover plugins that offer assistance you interface with proficient interpreters from inside your WordPress dashboard.
To make a multilingual site with ease, we suggest utilizing Polylang, one of the most well known WordPress interpretation plugins in the plugin directory.

With Polylang, you can utilize as numerous dialects as you need, which is look motor inviting and is moreover consistent with the WooCommerce plugin.
9. Must-Have WordPress Tools
WordPress is domestic to 55,000+ plugins and devices that you can utilize to extend the highlights and usefulness of your location. With these devices, you’ll never require to touch the coding of your location to make your possess customizations.
Aside from the apparatuses we specified over, here’s our best choose of the other must-have plugins for WordPress sites:
Build connections through mail showcasing with Consistent Contact
Resolve mail issues with WP Mail SMTP
Instantly move forward WordPress speed and execution with WPRocket
Build believe and certainty in guests with TrustPulse
Make excellent landing pages with SeedProd
Display computerized social media nourishes on your location with Smash Balloon
Automate admin errands and move forward client encounter with Uncanny Automator
Provide chat client back with LiveChat
Monetize your location with advertisements utilizing AdSanity
Create participation programs with MemberPress
All these apparatuses can be introduced in one press and they have simple setup wizards to offer assistance you get started.
For more plugins and apparatuses to offer assistance you advance and develop your location, see our direct: The Extreme List of Devices and Computer program for Little Businesses.
Comments